


 Copy Link
 Share on X
 Share on Facebook
 Share on LinkedIn


Always Active
Required for core functionality such as security, network management, and accessibility. These cannot be disabled.
Build intelligent AI systems that automate decisions, accelerate innovation, and scale business growth.
Design, build, modernize, and scale digital products that drive business growth.
Build secure, scalable, and intelligent platforms that power modern enterprises.
Build intelligent, connected, and autonomous systems that operate in the real world.
Flexible engineering capacity with predictable delivery, ownership, and outcomes.
Uncover the transformative potential of digital and mobile solutions for your industry

 Last Updated: Jul 16, 2026
Mar 14, 2024
Last Updated: Jul 16, 2026
Mar 14, 2024  6099
6099  15 min. Read


Key Takeaways
When developing a high-quality Flutter application, managing state can be a challenging task, especially when it comes to delivering a seamless user experience. Flutter has taken the application development world by storm by providing developers the ability to build incredible, cross-platform applications using a single codebase.
However, a critical aspect of developing responsive and dynamic applications lies in managing the app’s state effectively. However, with Flutter, it becomes easier as it comes with a set of state management solutions for different requirements and complexities.
In this article, we will explore the world of state management in Flutter, the challenges of managing states, its various patterns or approaches, and best practices to make the most out of it. Get ready to transform your Flutter development experience!
Let’s start by exploring the State Management in Flutter!
State management is a critical step in building mobile applications, especially in Flutter. If you are new to mobile application development, you must first get familiar with Flutter and how it helps with app development.
Flutter is a reactive framework that lets developers build cross-platform applications that work across Android, iOS, and web platforms. You can deploy these apps from a single codebase using Flutter. There is no need to write different codes for different platforms as you do while using a native app development framework.
Flutter was built by Google in 2018. At that time, it was made for mobile app development. Now it supports six platforms: Android, iOS, MacOS, Windows, Linux, and the web. Flutter is amongst the top four application development frameworks worldwide. More than 36000 projects were developed with Flutter and have been downloaded over 11 billion times.
According to the report, Google noted that there are over 1 million Flutter-based applications published, up from half a million in mid-2022. This shows that developers are recognizing the benefits of using Flutter for app development.
However, managing the state can be critical but also crucial at the same time as it needs careful consideration of the approaches used. We will discuss the approaches later. Let’s first have a discussion on state management in Flutter.
State refers to the data determining the application’s visual representation. In Flutter, ‘State’ is a dynamic value that can be changed on the runtime based on user interaction or other events. It is created when you build your widget and changes throughout the widget’s lifetime. Developers can provide dynamic and responsive User Experiences with the help of state management in Flutter. It allows storing and modifying user data in your app, such as user preferences, user authentication, real-time data from an API, and redirecting from one page to another.
Flutter comes with various approaches when it comes to state management. It ranges from the setState function for small apps to the Business Logic Component (BLoC) for more intricate ones and more. The approach or pattern of state management you use in Flutter depends on the application’s requirements.
Imagine you’ve poured your heart and soul into creating a stunning Flutter application. Users are initially captivated by the smooth animations and intuitive design. But as your app grows with new features and functionality, a hidden enemy emerges in complexity. Data flows become complex, UI updates lag behind user interactions, and the codebase starts to resemble a tangled mess. The culprit? Ineffective state management.
In the world of Flutter development, the state represents the dynamic data that breathes life into your app. It dictates how your User Interface reacts to user interactions, displays information, and maintains consistency across different screens. Effective state management ensures this data is handled efficiently, keeping your app responsive, predictable, and seamless to use.
Well, if you are looking to build fast-paced applications delivering interactive UIs across various platforms, consider Consulting TechAhead’s expertise in building powerful mobile applications using Flutter.
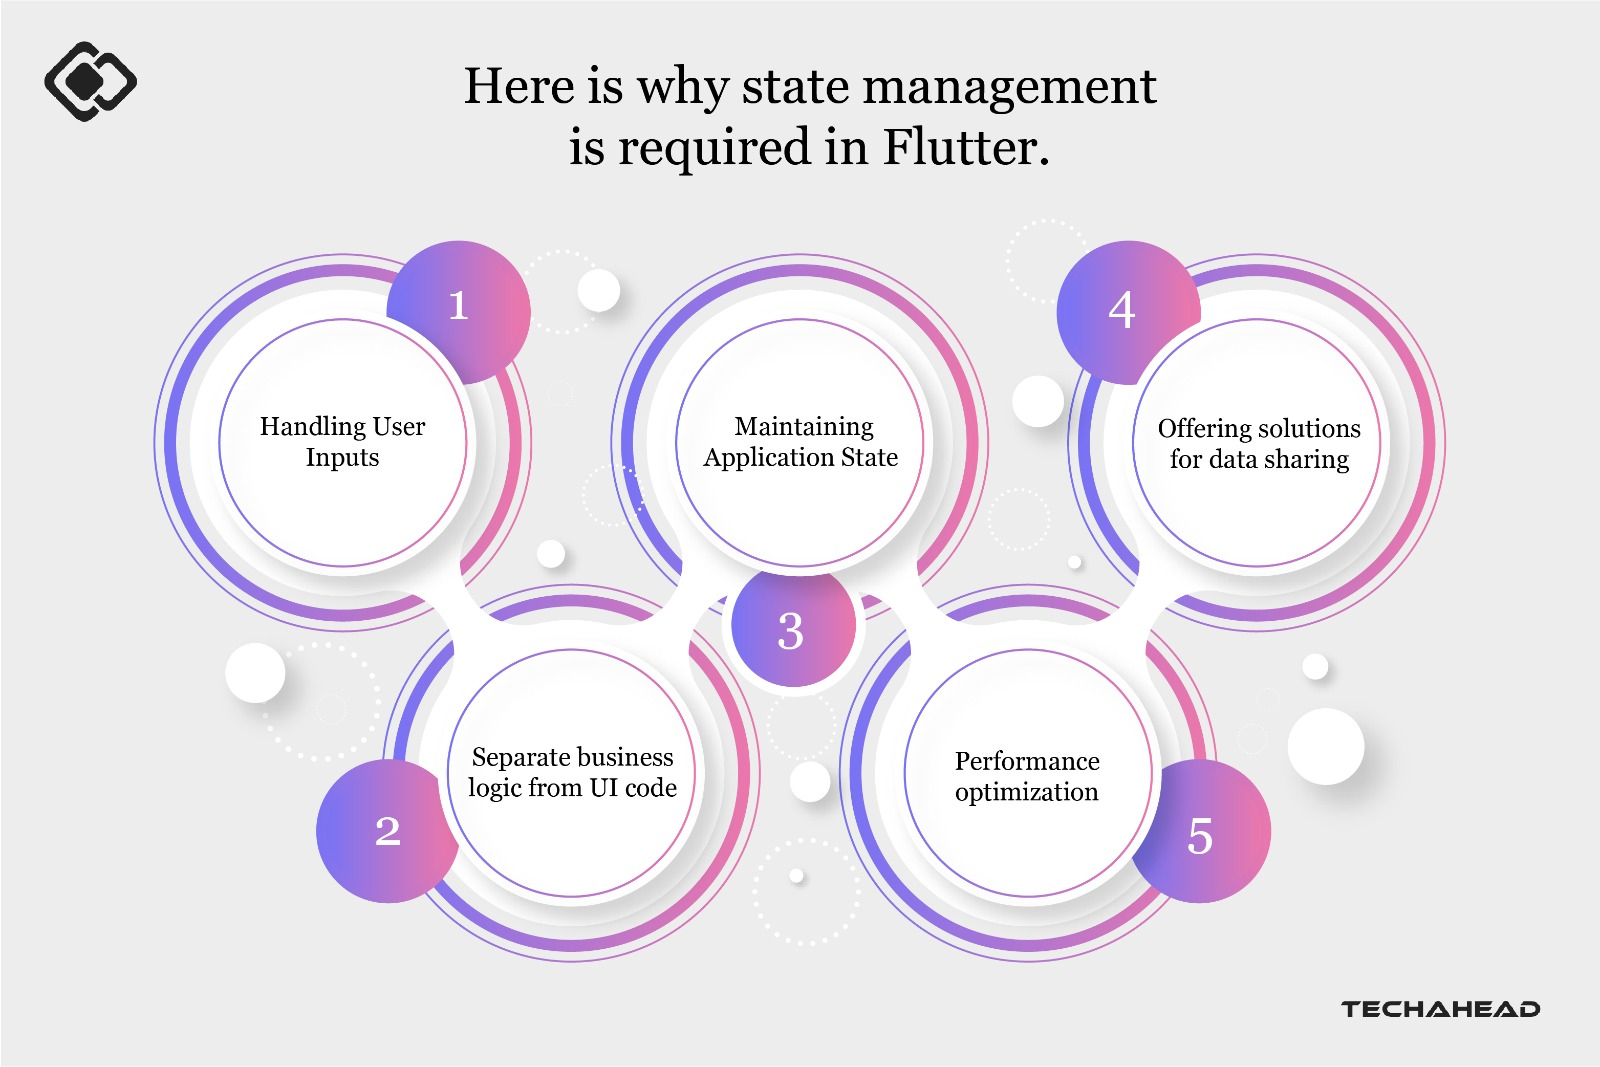
State management is important as it lets us centralize all UI states and manage the data flow in applications. Let’s understand this with an example.
When you open a new Flutter app for the first time, you go through the signup process, and the app greets you with a warm “Welcome!” message. Now, fast forward to your next visit. The app instantly recognizes you and displays a friendly “Welcome back!” message.
This personalized experience is due to state management. In Flutter, the state acts like the app’s memory, remembering details like login status and user information. This allows the app to adapt its behavior based on your past interactions, creating a more seamless and familiar user experience. Apart from that, choosing Flutter for your mobile application can quickly enhance application quality, speed, and design.
Choosing the right one can be daunting. Let’s discuss different state management patterns, how they are implemented, and the pros and cons so you can pick the right one based on your requirements.

Let’s explore different patterns available to manage state effectively in Flutter applications.
Flutter offers a fundamental approach to state management through Stateful Widgets. The setState() method is the heart of the state management in stateful widgets. When the user calls setState within the state class, it tells Flutter to rebuild the associated widget with the updated state data.
To implement `setState()` in Flutter, start with a `StatefulWidget` and its state class. Inside the state, declare a variable, such as `_isRed`, to track a specific condition. Use a function, `_toggleColor()`, to change this variable’s value.
Within this function, call `setState()` to update `_isRed`, which prompts Flutter to redraw the widget reflecting the new state. Attach this function to a user action, like pressing a button, to dynamically change the widget’s appearance, making your app interactive with minimal effort.
| Pros | Cons |
| Simple and understandable for beginners. Easy implementation for small apps. Suitable for self-contained widgets. | Requires passing data down the widget tree. Limited scalability for large apps. |
Provider is a state management solution in Flutter that builds upon the foundation of InheritedWidget. It has gained popularity for its simplicity and effectiveness in managing state within Flutter applications. With Provider, developers can easily provide data to any widget in their app, offering flexibility and enhancing productivity.
To implement Provider in Flutter for state management, developers first add the provider package to the project’s dependencies in the pubspec.yaml file. Then, they import necessary classes from the package, such as ChangeNotifierProvider. Next, they define a data model or a class extending ChangeNotifier to represent the state.
Afterward, they wrap the root widget with a Provider, specifying the data model or class. Within descendant widgets, they use Consumer or context.read<T>() to access and consume the data. Finally, they can use context.watch<T>() to listen for changes and update the UI.
| Pros | Cons |
| Simplifies state management. Offers flexibility in data provisioning. Optimizes widget rebuilds efficiently. | Learning curve for newcomers. Potential boilerplate code overhead. |
Riverpod is a widely-used state management library in Flutter. Built on top of the Provider package, it provides a straightforward yet powerful approach to managing state in Flutter apps. Riverpod allows for the storage and retrieval of application state, which can be accessed across various widgets.
To implement RiverPod, an alternative to Provider, in your Flutter project, first add the RiverPod package to your dependencies in the pubspec.yaml file. Then, create a Provider object using the Provider() constructor to manage your app’s state. Wrap your app with a ProviderScope widget in the widget tree to establish a scope for your Providers. Pass the Provider object to the ProviderScope.
Now, any widget within the tree can access the Provider object using Provider.of() for efficient state management. RiverPod’s features like Providers and ProviderScope simplify state management, offering flexibility and organization. Its Dart package compatibility also makes it a versatile choice for state management in your applications.
| Pros | Cons |
| Declarative and reactive state management. Scoped dependency injection for better organization. Seamless integration with Flutter. | Learning curve for beginners. Requires additional boilerplate code. |
MobX is a comprehensive state management solution for applications, leveraging reactive programming principles to manage application states efficiently. It is framework agnostic, supporting multiple JavaScript frameworks and Flutter. MobX emphasizes an observable state mechanism that automatically notifies observers about state changes.
Implementing MobX involves creating a class that uses the Store mixin to manage application state. State variables are marked with the @observable annotation to make them reactive, and state-modifying methods are annotated with @action to indicate that they can change the state.
After defining the state management logic, build_runner is used to generate code, enabling MobX’s reactive features with minimal boilerplate. The application’s UI components, such as widgets, can then utilize these reactive states through MobX’s Observer widget, allowing for dynamic updates based on state changes.
| Pros | Cons |
| Reduces boilerplate with code generation. Supports multiple frameworks and Flutter. Simplifies reactive application development. | Testing procedures not well-documented. Difficult integration with other solutions. |
GetX is a comprehensive Flutter package offering state management, dependency injection, and more, renowned for its simplicity. It stands out for not requiring developers to learn new concepts, making it an accessible choice for all levels of Flutter developers.
To implement GetX in Flutter, first, create a ColorTogglerController extending GetxController with observable properties marked by .obs. Methods like toggleColor update these observables. Use Get.lazyPut() to instantiate the controller and Obx() in widgets to rebuild UI elements automatically when observables change, ensuring efficient and minimal code for reactive state management.
Additionally, for specific state management needs, GetX offers GetBuilder and GetX<Controller> widgets, which allow for more controlled and efficient UI updates by selectively rebuilding widgets based on state changes.
| Pros | Cons |
| Simplifies Flutter state management. Efficient, minimal code needed. Strong documentation and community support. | Less ideal for complex scenarios. “Magic” may obscure deeper understanding. |
The BLoC (Business Logic Component) is a popular architectural approach for managing state in Flutter applications. It is best for the mid to large-scale applications. It promotes separation of concerns by decoupling the User Interface from the business logic.
To implement BLoC for state management in Flutter, start by defining a ColorTogglerBloc that extends Bloc<ColorTogglerEvent, ColorTogglerState>, managing the business logic for toggling colors. Use events like ToggleColorEvent to trigger state changes, handled in the bloc’s event handler _onToggleColor, which updates the UI by emitting a new state.
In your UI, utilize BlocProvider to inject the BLoC and access its state within widgets, such as ColorTogglerPage, using context.watch<ColorTogglerBloc>() to rebuild the widget in response to state changes.
| Pros | Cons |
| Separates UI from business logic. Comprehensive testing with bloc_test. Complete documentation and community support. | Requires more boilerplate code. Less ideal for simple scenarios. |
Redux for Flutter is a state management library that emphasizes unidirectional data flow, ideal for developers familiar with similar concepts from React. It centralizes application state in a single store, simplifying state updates and management.
To implement Redux in Flutter, start by defining a state model such as ColorTogglerState and an actions enum to specify the actions that can be performed on the state. Then, create a reducer function, like toggleColorReducer, that takes the current state and an action, returning a new state based on that action.
Next, initialize a Redux store with the reducer and the initial state. This store is then passed through the app using StoreProvider, allowing widgets to connect to the store via StoreConnector. This setup enables widgets, like TextButton, to dispatch actions and rebuild themselves based on the state changes triggered by those actions.
| Pros | Cons |
| Simplifies state management. Good for sharing state across screens. Separates state logic from UI. | Requires boilerplate for reducers/states. Documentation can be sparse and scattered. |
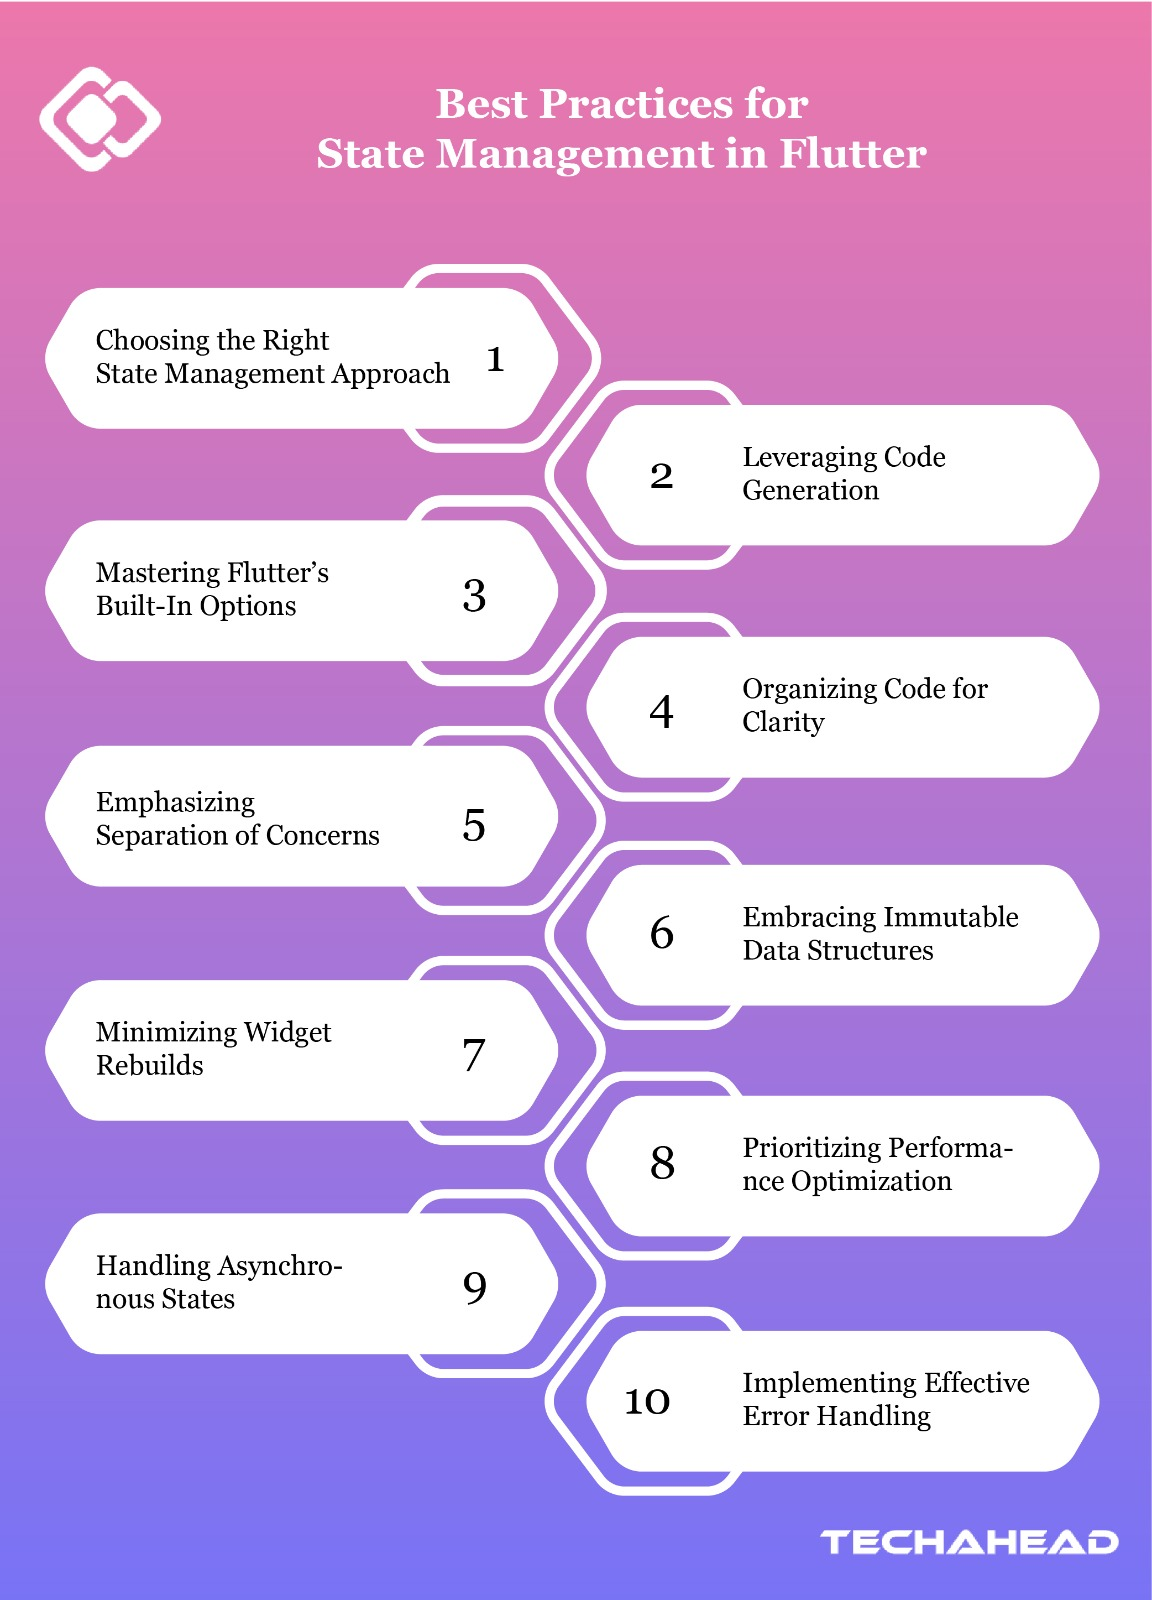
Here are some best practices for better state management in Flutter.
Selecting the appropriate state management solution is the foundation of a robust Flutter app. For simpler applications, setState may suffice, but as complexity grows, structured solutions like Riverpod or BLoC (Business Logic Component) become essential. Assess your app’s requirements thoroughly to make an informed choice, ensuring scalability and maintainability.
Before diving into third-party solutions, familiarize yourself with Flutter’s inherent state management tools – setState, InheritedWidget, and ValueNotifier. These built-in mechanisms are powerful for simpler applications and understanding them lays a solid foundation for more complex state management strategies.
A clear distinction between business logic and UI code is vital. This separation not only streamlines development but also simplifies testing and future modifications. Adopt architectural patterns like BLoC to segregate your app’s functionality systematically.
Efficient UI updates are key to smooth performance. Utilize const constructors and ValueKey where applicable to reduce unnecessary widget rebuilds. Such optimizations ensure your app remains responsive and energy-efficient, enhancing user satisfaction.
Asynchronous operations are integral to modern apps. Choose a state management solution that excels in managing async data, such as Riverpod, Provider, or Bloc. These frameworks offer streamlined ways to handle data fetching, network requests, and user interactions without compromising the UI’s responsiveness.
Minimize boilerplate with code generation tools like json_serializable and freezed. These tools automate the creation of serialization logic, data classes, and immutable objects, reducing manual coding errors and speeding up development.
An organized codebase is easier to navigate, update, and debug. Adhere to best practices in code organization, employing architectural patterns to separate UI, business logic, and data layers effectively. This organization facilitates teamwork and enhances code readability.
Immutable data structures promote predictability and simplicity. Utilize final and copyWith to manage state changes explicitly, ensuring that data modifications are intentional and traceable, thereby preventing side effects and enhancing state consistency.
Performance is paramount. Optimize state management to ensure your app’s UI updates are efficient and resource-conscious. Techniques like using const keywords, and optimizing widget rebuilds with Consumer and Selector, can significantly improve your app’s responsiveness and resource usage.
Comprehensive error management is essential for reliability. Implement global error handlers, utilize try-catch blocks for async operations, and provide clear user feedback on errors. Thoughtful error handling not only improves user experience but also aids in debugging and maintaining app stability.
To summarize, this article discusses the importance of state management in Flutter, why it’s required, different approaches or patterns, and the best practices. By exploring different approaches such as Redux, Provider, BLoC, Scoped Model, GetX, and more, we have seen how each one of them has its own pros and cons.
If you want to develop user-friendly and reliable dynamic mobile applications using Flutter, it’s essential to master state management. Remember that effective state management is the realm as you set out on your journey of building engaging and dynamic Flutter applications.
Lastly, the key to effective Flutter development with the right state management lies in understanding your application’s requirements. We hope this article proved insightful for managing states in your Flutter applications. Contact us today for expert help, fast results, or to augment your team!
Selecting the optimal state management for Flutter relies on app complexity and developer expertise. BLoC is ideal for intricate apps requiring robust business logic separation. Provider offers simplicity and ease for smaller projects. Riverpod introduces flexibility and testability advantages. Evaluate project needs and team familiarity to make the best choice.
Choosing the best state management approach depends on factors like project complexity, team skill level, and specific requirements. Consider options like Provider for the shared state, GetX for simplicity, Bloc for complex apps, and Redux for synchronous app logic.
Popular state management options in Flutter include Provider, GetX, Riverpod, Stateful Widgets, Bloc (Business Logic Component), Inherited Widget, and Redux. Each has distinct features and applications, catering to different project requirements and complexities.
Provider simplifies state management with minimal boilerplate, making it suitable for less complex projects and developers seeking straightforward solutions. BLoC employs an event-driven architecture and offers detailed control over application states. It is ideal for complex scenarios requiring thorough separation of business logic from the user interface.
We use cookies to ensure our website functions properly, improve performance, and provide a personalized experience. You can choose which types of cookies to allow below.
Required for core functionality such as security, network management, and accessibility. These cannot be disabled.
Help us understand site traffic and user interactions so we can improve performance and usability.
Enable enhanced functionality and personalization such as language or region preferences.
Used to deliver relevant ads, track campaign performance, and measure advertising effectiveness.