


Staff Augmentation
Access top-tier talent on demand: Dedicated, Hourly, or Flexible.


 Copy Link
 Share on X
 Share on Facebook
 Share on LinkedIn
Ready to build your first mobile experience in 2025, but wondering how to develop an Android app? Cut through the complexity with this practical guide. From mastering Android Studio to crafting a sleek interface with modern tools, and from writing your first lines of code in Google-recommended Kotlin or Java to getting your app user-ready, we’ll detail the steps for a seamless development process. You’ll find actionable advice here to help turn your app concept into a polished product ready for the Google Play Store.
Key Takeaways
- Android Studio is the primary IDE for Android app development, offering tools like a code editor, debugging, testing, performance tools, and AI-powered coding assistants. It simplifies the creation of optimized Android App Bundles (.aab) with its Gradle-based system.
- Developers have the option to choose between Java and Kotlin for coding, with Kotlin offering advantages like concise syntax and built-in null safety features. The Android SDK is also essential, providing tools and guidelines like Material Design 3 for UI development.
- The process of Android app development encompasses UI design using components and layouts, adding functionality, testing, and debugging within Android Studio, and can be enhanced with advanced features such as push notifications, location services, and cloud integration before publishing on Google Play.
How to Get Started with Android App Development?

The process of developing an app for the Android platform offers substantial rewards and prospects, presenting immense advantages such as captivating users, ensuring consistent performance across various devices, enjoying extensive community backing, and the possibility of weaving in advanced technologies like AI, IoT app development, and AR/VR. For mobile app developers who venture into Android’s realm, it’s a chance to turn creative visions into tangible applications where possibilities soar boundlessly.
Android is celebrated for its open accessibility and minimal barriers to entry, which creates an attractive environment for both novice and veteran app creators. With streamlined workflows that allow for rapid prototyping, crafting apps on this platform accelerates market arrival times significantly, allowing developers swift access to their target user base around the globe.

Android Studio: The Essential IDE
Android Studio serves as the go-to integrated development environment (IDE) for crafting Android apps, acting as a steadfast ally in this endeavor. It offers an array of tools specifically geared toward developers, including:
- A sophisticated code editor with intelligent code completion
- Templates to jumpstart app creation
- Tools dedicated to development, debugging, testing, and improving performance
- Configured emulators that simulate various devices
- Built-in AI coding assistants (like Gemini) to accelerate troubleshooting and code generation
This IDE supports a modular approach within its project structure and leverages Gradle for flexible build configurations, simplifying the process of generating optimized Android App Bundles (.aab) suited to different device types. Within your Android Studio project space inside the IDE itself, you can perform inline debugging and use performance profilers, which help you monitor resource utilization, pinpoint memory leaks, and fine-tune overall app efficiency while managing your application files with proficiency.
Designed to be platform agnostic, Android Studio operates smoothly on Windows, macOS, and Linux systems. The interface presents an intuitive experience regardless of operating system, ensuring uniformity across varying platforms.
Java or Kotlin: Which Language Should You Choose in 2025?
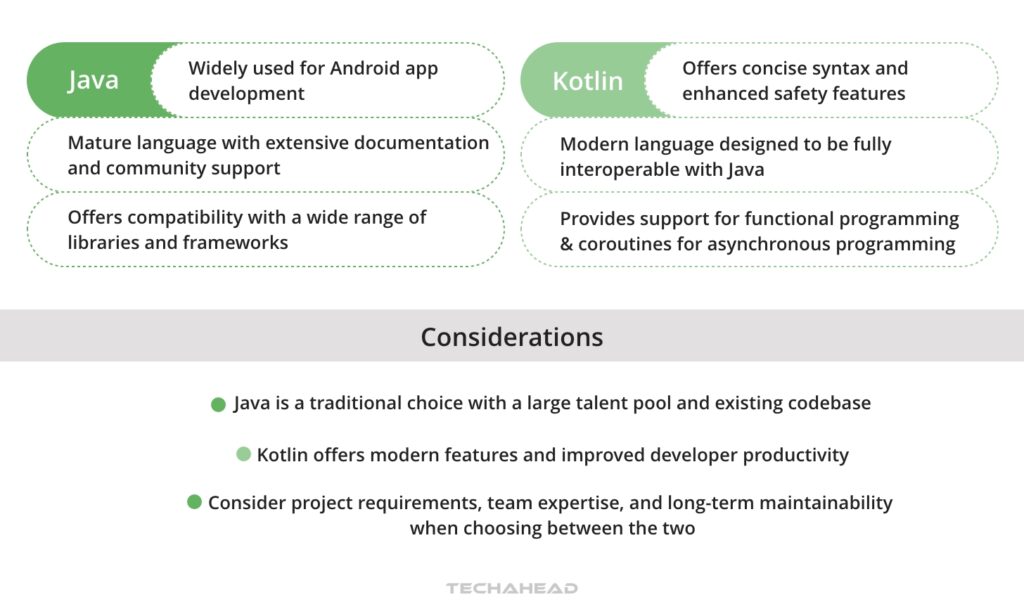
In the realm of Android app development, Java and Kotlin remain the two prime options for programming languages. For a long time, Java has been the go-to language favored by developers for crafting Android apps due to its longstanding presence in the field. However, Google has officially adopted a “Kotlin First” approach. Kotlin is now the standard within the Android development sphere with its contemporary approach that offers more streamlined syntax and efficient coding practices compared to Java.
Kotlin distinguishes itself with features like null-safety, which play a significant role in minimizing common issues such as null reference exceptions and full compatibility with modern UI toolkits like Jetpack Compose. This positions it as the essential choice among programmers for new projects. Nevertheless, whether one’s preference lies with legacy Java or leans towards modern Kotlin, both veterans and new entrants into Android app creation have the liberty to pick whichever language aligns best with their competencies and project requirements.
What is the Android SDK and why is it Essential?
The Android SDK serves as an essential suite of tools for developers engaged in Android app development, akin to a multifunctional Swiss Army knife. It provides an extensive assortment of tools for both development and debugging, including platform-tools, build-tools, and the Android Jetpack libraries that streamline the process of creating apps. By offering various SDKs designed specifically for different versions of Android, it empowers developers to tailor their applications to a broad spectrum of Android devices.
One notable aspect is the integration of Material Design 3 (Material You) within the ecosystem. This offers a cohesive set of aesthetic guidelines that assist in forging user interfaces that are not only visually consistent but also inherently intuitive—thereby significantly improving the user experience within your app.
How Do You Design a User Interface for Your Android App?
If you are an Android app developer trying to build a successful app, then it’s crucial to focus on the user interface design. This is because a well-designed and accessible UI plays an essential role in elevating the overall experience for users, thereby aiding in making your Android app more successful. It acts as a pivotal connector between your application and its users. Hence, creating a strong and appealing product falls under your responsibility.
To boost an Android app’s aesthetic appeal could involve straightforward enhancements like implementing dark mode support, refining buttons or TextView aesthetics, or improving usability through careful adjustment of padding and margins that affect spacing within UI elements. The subsequent sections are set to delve into the two main approaches to UI design: the modern Declarative approach (Jetpack Compose) and the classic View-based approach.
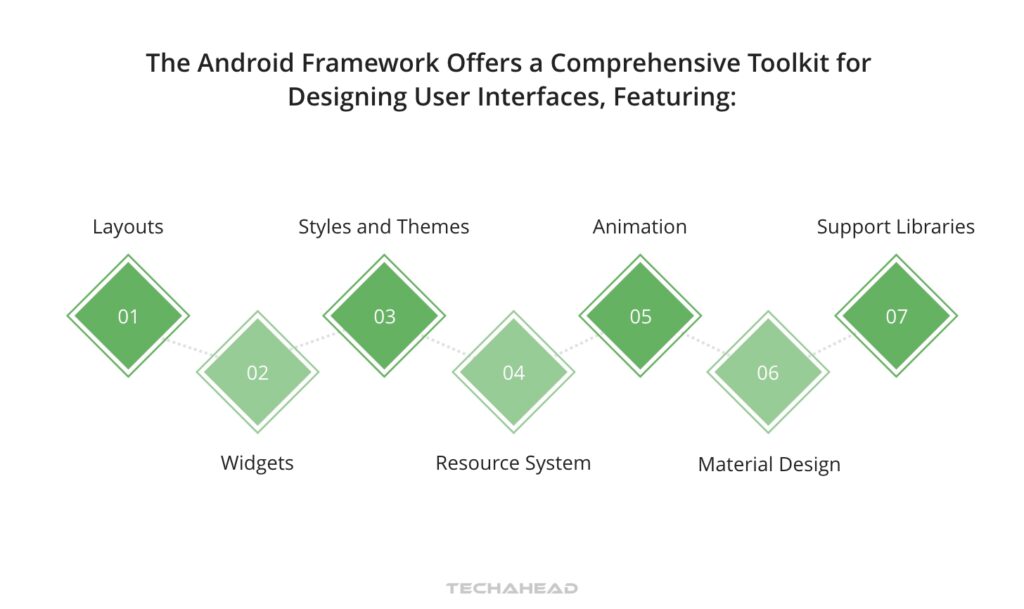
What are the Key UI Components and Layouts?
The Android framework provides two primary toolkits for user interface design:
1. Modern Declarative UI (Jetpack Compose): This is the current recommended standard. It uses Kotlin code to describe UI elements rather than XML files, allowing for:
- Faster development with less code.
- Dynamic UI updates without manual state manipulation.
2. Classic View System (XML): The traditional framework provides an extensive toolkit, including:
- Individual view classes, such as Button or TextView.
- ViewGroup categories, like LinearLayout and ConstraintLayout.
- UI elements, including the Next button and the floating action button.
- The critical role played by view IDs in designing interfaces.
This range of tools allows for a broad spectrum of design options.
Within Android Studio, you can choose between the visual Layout Editor for XML or the Live Preview for Compose to visually compose your application’s UI. Essential aspects of the Layout Editor include:
- The use of constraint properties to define positions for views like TextViews within a layout.
- A root view that encompasses all other subviews within it
- Constraints between views enabling adaptable layouts compatible with diverse screen dimensions
-Incorporating Material Design 3 guidelines on margins and padding helps significantly enhance the aesthetic appeal of an app’s interface.
Material Design 3 Guidelines
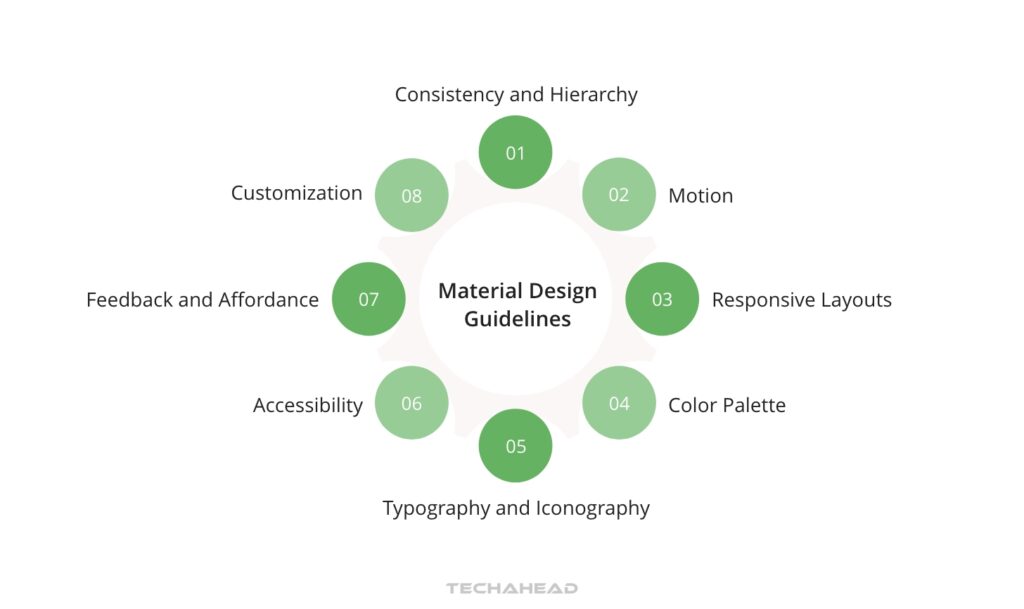
Material Design 3 (MD3) infuses a sense of realism into the user interface of your Android app, employing tangible surfaces, striking graphic design, and dynamic color systems to forge a feeling of depth and authenticity. The aim is to deliver consistency across various platforms and devices through responsive designs and adaptable components.
Google offers distinct UI elements along with resources like the ‘Material Components for Android’ library, specifically crafted for developers looking to integrate MD3 in their apps. Adherence to these standards allows you to develop an aesthetically unified and instinctive UI that automatically adapts to the user’s system colors, elevating the user experience within your application.
TL;DR for Developing Your First Android App
| Section | Quick Summary |
| Create Project | Start a new Android Studio project, pick name, API level, and language (Kotlin/Java). |
| Build UI & Features | Design layouts with Views, add interactivity and core functionality. |
| Test & Debug | Use Android Studio tools and virtual devices to fix bugs and ensure quality. |
| Push Notifications | Add real-time updates using Firebase Cloud Messaging. |
| Location Services | Integrate maps, tracking, and geofencing responsibly. |
| Cloud Integration | Use cloud tools for sync, AI features, and security. |
| Prepare for Release | Sign APK, test on devices, set pricing, and localize content. |
| Publish on Play Store | Upload app, add visuals, and release to global users. |
Developing Your First Android App: A Step-by-Step Tutorial

Having grasped the fundamental concepts, you’re now ready to apply what you’ve learned and embark on creating your first Android app. This segment is dedicated to guiding you meticulously through each phase of development—beginning with establishing a new project, incorporating user interface components, adding features, and advancing all the way through testing and troubleshooting your application.
Upon completing these steps diligently, you will have accomplished the milestone of crafting an Android app—a product of your own creation that stands as a testament to your newly acquired skills.
Creating a New Project
Starting a new project in Android Studio is essential when you want to develop and bring your app idea to life. When creating a new Android Studio project, the modern wizard prompts you to select a specific template, such as ‘Empty Activity’ for Jetpack Compose or ‘Empty Views Activity’ for legacy layouts, complete with corresponding sample code and resources.
As part of setting up your project, it’s necessary to define its name, designate the package name for your application, and choose where on your computer the project files will be stored. It’s also important to select a Minimum SDK level (e.g., Android 7.0) that suits the range of devices you wish for your app to support, along with confirming the Build Configuration Language (typically Kotlin DSL). Both decisions influence how well-suited your app will be across various devices and what functionalities can ultimately be implemented.
Adding UI Elements and Functionality
After the initial setup of your project, the next step is to animate it with user interface elements and features. While traditional Android development relied on a hierarchy of View and ViewGroup objects, modern development increasingly utilizes Jetpack Compose to build UIs directly with Kotlin code. To maintain functionality on different screen sizes across devices, it’s essential to specify view dimensions using relative units such as density-independent pixels.
To allow interaction within your app, you can attach event handlers (in Compose) or click listeners (in Views) that define behaviors when items like buttons are activated by a user’s touch. By employing Kotlin to incorporate fundamental functionalities, you’re able to create an app experience that both engages and accommodates users seamlessly
Testing and Debugging the App
The process of app creation for Android involves crucial steps like testing and debugging. To optimize performance by analyzing memory utilization, Android Studio offers potent tools, including the comprehensive Android Profiler for real-time CPU, memory, and energy monitoring. To maintain code integrity throughout compilation, Lint checks, along with integrated development environment inspections, are automatically conducted within Android Studio.
Android Studio’s Device Manager equips you with the capability to:

- Simulate a wide array of configurations for virtual Android devices during your testing phase
- Verify that your app meets both quality standards and complies with Google Play policies
- Smoothly transition toward publishing your application on the Google Play Store.
Enhancing Your Android App with Advanced Features

Don’t rest on your laurels after creating your inaugural Android app. Elevate the user experience by incorporating sophisticated functionalities such as push notifications, which keep users engaged and informed. Utilize a wealth of tools, including location services and cloud integration, to expand the capabilities of your Android application, ensuring it stands out in a crowded marketplace.
Implementing Push Notifications
Push notifications serve as an efficient mechanism to provide real-time updates and maintain user engagement with your app. They can be seamlessly integrated using Firebase Cloud Messaging (FCM), ensuring that messages are delivered automatically to users.
In order to set up push notifications, follow these steps:
- The first step is to ask if the user wants to get the notifications by requesting the Post_NOTIFICATION runtime permissions.
- Then, in the manifest of your application, create a service by extending the FirebaseMessagingService.
- Create a notification channel for message delivery. You have the flexibility of selecting FCM’s default channel or creating a custom one.
- Upon first launch of your app instance, FCM will create a unique registration token which can be tracked by overriding the onNewToken method in FirebaseMessagingService extension.
- Employing Google Analytics enhances messaging strategies and provides insightful delivery metrics for optimization purposes.
Leveraging Location Services
Incorporating location services into your app can markedly improve the experience for its users. Features like automatic tracking can be implemented, which not only assist in determining whether a user is on the incorrect side of a street, but also in recognizing their activities.
To ensure that location tracking does not drain the device’s battery life excessively, adherence to guidelines regarding background location limits is crucial. By incorporating maps within your app, you offer users the ability to visualize points of interest and have control over how these maps are displayed. With geofencing technology, it’s possible to create virtual boundaries around areas in the physical world, allowing monitoring within those specified regions.
Integrating with Cloud Services
Utilizing cloud services can greatly enhance the functionality of your Android app, providing users with a smooth and consistent experience. These services enable apps on mobile devices to scale effectively, maintaining performance despite fluctuating demands from users.
With cloud platforms offering AI and machine learning capabilities, developers have the tools to increase their app’s intelligence and provide more personalized experiences for mobile device users. Real-time data synchronization ensures that user information remains current across all devices used. Incorporating edge computing can lead to faster data processing, which contributes to a better overall user experience.
Leveraging cloud services not only cuts down on infrastructure costs, but also offers strong security measures to protect both the app and its users’ data.
Publishing Your Android App on Google Play Store

Completing your journey in app creation involves the pivotal phase of releasing your Android app to users through the Google Play Store. This platform is recognized for its straightforward submission procedure and adaptable guidelines.
By choosing to publish on the Google Play, you expose your app to a vast audience and enjoy the advantage of automated testing reports via the Play Console.
Preparing Your App for Release
Before uploading your application to the Google Play Store, it is essential that you ensure it’s ready for public distribution. This preparation involves:
- Generate a signed Android App Bundle (.aab) and enroll in Play App Signing
- Confirm that your app functions seamlessly across various Android devices by utilizing the automated Pre-launch Report provided by the Play Console.
- Fine-tuning performance wherever necessary.
- Establishing a pricing model for your app.
- Evaluating whether to incorporate in-app purchases using the Google Play Billing Library.
If you aim to make your application available globally, consider taking these measures:
- Adapt your app’s textual content, Play Store presentation, and any marketing materials so they resonate with the languages and cultural peculiarities specific to each target market.
- Ascertain the appropriate content rating for your software and manage country-specific availability consistent with strategic business aims.
Thrash out all critical product particulars in readiness for creating an appealing listing on the Google Play Store.
By executing this comprehensive set of guidelines meticulously when launching internationally through Google Play. Developers can successfully connect with users from numerous countries, effectively engaging them through their Android devices.
Submitting Your App to the Google Play Store
Upon finalizing your app for launch, the subsequent move is to upload it to the Google Play Store. This requires you to produce and submit engaging promotional imagery, screenshots, and videos that effectively highlight your application on its store listing.
Summary
Kudos on your successful voyage into the world of Android app development, mastering the creation process, elevating it with modern functionalities, and releasing it onto Google Play. You’ve joined ranks with a worldwide network of developers dedicated to molding tomorrow through each individual app. Bear in mind that developing an app is an ongoing adventure filled with perpetual growth and refinement. Persist in your quest for knowledge, maintain your pursuit of learning new tools like Jetpack Compose, and above all else – continue to innovate!

Frequently Asked Questions
How do I start developing Android apps?
Commence your journey in Android app development by gaining proficiency in a programming language like Kotlin or JavaScript, and then proceed to install and configure Android Studio on your computer.
Next, initiate a new project within the platform and embark on writing code while paying attention to the layouts as you advance through your project.
Is it difficult to develop an Android app?
Certainly, crafting an app for Android platforms may pose difficulties for newcomers, given the need for sophisticated programming abilities and the somewhat inflexible attributes of mobile coding languages. Despite these challenges, acquiring the essential skills and proficiency in relevant languages is a demanding yet achievable endeavor. However, if you find the native learning curve too steep or need to launch on iOS simultaneously, you might consider leveraging cross-platform app development services to streamline the process.
How much does it cost to build an Android app?
Building an Android app can incur widely different expenses, as basic apps may cost anywhere between $40,000 and $300,000. In contrast, the price for developing more sophisticated Android apps can start at $50,000 and go up to or exceed half a million dollars, depending on the project’s details and complexity.
Can I create my own Android app?
Indeed, it is possible to construct an Android app using tools such as AppYourself even without expertise in programming. You have the ability to easily craft an Android application equipped with appropriate features and modules tailored for a range of industries.
Which programming language should I choose for Android app development, Java or Kotlin?
Kotlin is the official standard and the preferred choice for all new Android development. While you can still use Java due to its conventional methods, Kotlin provides modern features like coroutines, less boilerplate code, and full compatibility with the latest Android libraries. The decision should hinge on your project requirements, but Kotlin is strongly recommended for future-proofing.


