 Hire by Skill
 Hire by Role


 8 min. read
 Published: Dec 18, 2023
 Views: 581

Swift has emerged as the go-to language for building robust and efficient applications across the Apple ecosystem. However, the reality is that Objective-C still plays a significant role, especially in larger and older applications. Many development teams find themselves grappling with the challenge of transitioning from Objective-C to Swift, a process that demands careful consideration and strategic planning.
Drawing from my experience of working on a sizable iOS and tvOS app for nearly four years, I aim to shed light on the nuances of migrating from Objective-C project to Swift. The journey was not without its challenges, and the initial stages were marked by a steep learning curve. Over time, we honed our approach, navigated complexities, and eventually, achieved a seamless transition to Swift.
I recognize that numerous teams are currently managing Objective-C files and encountering obstacles in making a successful leap to Swift. To assist those in a similar position, I’ll share valuable insights, best practices, and practical tips that can guide you through this transformation process.
From understanding the intricacies of Objective-C code to incorporating Swift syntax, we’ll explore the entire spectrum of transitioning, covering topics such as creating bridging header files, converting Objective-C classes, dealing with header files, and ensuring interoperability between the two languages.
Whether you’re looking to convert a single Swift file, an entire project, or an existing Objective-C app, this blog post aims to provide a comprehensive resource for making a smooth and effective transition.
Creating a Bridging Header File
When you are migrating from Objective-C to Swift code within an iOS app, creating a bridging header file is a crucial step to enable smooth communication between the two languages. Whether you’re adding Swift code to an existing Objective-C app or vice versa, this section explores the essentials of creating a bridging header for a seamless integration.
Xcode steps in with a helpful prompt to configure an Objective-C bridging header. This prompt appears when you add a Swift file to an existing Objective-C app or an Objective-C file to an existing Swift app. This process sets the foundation for a harmonious coexistence of the two languages within your project.
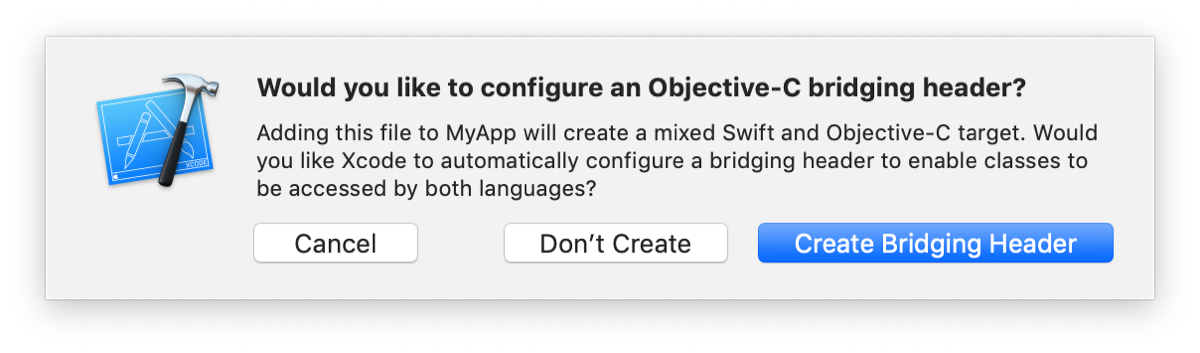
Automatic Bridging Header Creation
If you accept Xcode’s offer, the tool creates the bridging header file for you. It names the file using your product module name followed by “-Bridging-Header.h.” This automatic creation ensures a standardized and organized approach to bridging the Objective-C and Swift worlds within your app.
Manual Bridging Header Creation
Alternatively, you have the flexibility to create a bridging header manually. Simply navigate to File > New > File > [operating system] > Source > Header File, and you’re on your way to creating a custom bridging header.
Bridging Header Configuration: Exposing Objective-C to Swift
Once you have your bridging header in place, the next step is to edit it to expose your Objective-C code to your Swift code. Follow these steps:
- Import Objective-C Headers: In the bridging header file, import every Objective-C header you want to expose to Swift. This step ensures that Swift can seamlessly access and interact with your Objective-C code.
- Build Settings Configuration: In Build Settings, under Swift Compiler – General, confirm that the Objective-C Bridging Header build setting has the correct path to your bridging header file. Typically, Xcode sets this path automatically, and in most cases, no modification is needed.
With your bridging header configured, any public Objective-C headers listed in the file become visible to Swift without the need for import statements. The Objective-C declarations are now automatically available from any Swift class within the target, allowing you to use classes and other declarations from your custom Objective-C code with the same Swift syntax used for system classes.
How to Prepare Objective-C Code for Migration?

As you gear up to transition your iOS project from Objective-C to Swift, laying a strong foundation is crucial. Modernizing your Objective-C code before the migration process not only streamlines the transition but also ensures that your codebase is in sync with the latest standards.
Embracing Modern Objective-C with Xcode’s Converter
Before diving into the migration process, leverage Xcode’s modern Objective-C converter to bring your code up to date. This powerful tool can assist in automating several aspects of modernization:
1. Change id to instancetype
Update your codebase by replacing occurrences of id with instancetype where appropriate. This not only enhances clarity but also aligns your code with contemporary Objective-C practices.
2. Utilize Correct Enum Macros
Xcode’s converter helps ensure that your enum macros are up to date. By automatically applying the correct enum macros, it prevents potential compatibility issues and ensures a smoother migration process.
3. Adopt Modern @property Syntax
The converter aids in transitioning to the more modern @property syntax, aligning your Objective-C code with the latest language conventions. This not only improves readability but also sets the stage for a seamless transition to Swift.
While Xcode’s converter provides valuable assistance in identifying and applying these modernizations, it’s essential to note that it doesn’t interpret the semantics of your code. Manual review and confirmation of changes are crucial, as the converter may not accurately discern the intent behind certain code patterns.
Manual Review is also important to ensure Semantic Accuracy
One critical aspect often overlooked is the semantic interpretation of your code. For instance, the converter may not recognize that a particular method is an action affecting your object’s state. It might mistakenly suggest modernizing the method to a property.
Therefore, thorough manual review is imperative to confirm that the changes align with your code’s intended semantics.
Now we can begin with the Obective-C to Swift code migration process.
How to Migrate Objective-C code to Swift?

Migrating from Objective-C project to Swift code, it’s essential to follow a structured approach. This not only ensures a smooth migration but also sets the stage for enhanced compatibility and future-ready app development.
Here is a step by step process that we at TechAhead have implemeted for successful migration from Obective-C to Swift code:
Step 1: Modify Existing Codes
The journey begins with a meticulous review of your existing Objective-C codebase. By revising and modifying these codes in alignment with Swift file, you pave the way for a more compatible and rapid Swift app development process. It’s crucial to address any discrepancies in the code early on to prevent unforeseen issues later in the app’s performance.
Step 2: Define Routes to Migrate Codes
Opting for a per-file approach proves to be an efficient strategy for migrating Objective-C codes to Swift. This method allows developers to migrate codes incrementally, providing flexibility and ease of integration.
By creating Swift files for each Objective-C class, you ensure a seamless transition, with UI components effortlessly adapting to the new Swift structure.
Step 3: Begin Code Migration Process
With a solid foundation laid in the previous steps, the actual migration process begins. Developers start with the newly created Swift class, subclassing all Objective-C classes, and adapting their respective protocols.
This step involves integrating Swift API, ensuring a smooth transition and a harmonious coexistence between the two languages.
Step 4: Start Code Implementation
To construct your new Swift codebase, modification of import statements in existing Objective-C code is paramount. Removal of the original Objective-C .m file from the target route streamlines the process, allowing for a refined code structure under the name of the Swift class. This step sets the stage for the final implementation.
Step 5: Troubleshooting is as important
In the final step, troubleshooting becomes essential to ensure a flawless migration. Attention to detail is critical, from preventing duplicate symbol errors to creating descendants of Objective-C files in Swift. Developers utilize commands like command-click to inspect Swift class details, ensuring a comprehensive and error-free migration process.
As you reach the end of this step-by-step guide, remember that successful code migration is not just about the process but also about testing and validation. Employ Xcode’s UI testing framework to thoroughly test the scalability and performance of your Swift application. This ensures a final version that aligns with the highest standards of quality and functionality.
By following these steps, you not only navigate the intricacies of Objective-C files to new Swift code migration but also position yourself as a forward-thinking developer or decision-maker.
Conclusion
Drawing from hands-on experience and lessons learned in the trenches of iOS and tvOS app development, this step-by-step guide provides a comprehensive roadmap for developers and decision-makers alike.
As the guide concludes, the emphasis is on testing and validation, ensuring that the final Swift application meets the highest standards of quality, scalability, and performance. For those seeking expert assistance in this transformative journey, Techahead stands as a reliable partner, offering tailored services to meet specific business needs.
Staying ahead means embracing change with expertise. The Objective-C to Swift transition is not just an update; it’s an evolution toward a more streamlined, robust, and future-proof iOS app development process.
As you begin this transformative path, leverage the insights and best practices shared in this guide to navigate with confidence and emerge as a trailblazer in the realm of iOS development.
For a consultation and personalized assistance, Reach Out to Techahead today. Your next iOS success story awaits!


